
Making a Sale
This guide will walk you through the complete process of making a sale in REVPOS, from item selection to payment and invoice printing.
Sales Process Overview
The sales process consists of five main steps:
- Navigate to Sales
- Select Items
- Review Summary
- Process Payment
- Print Invoice
Step 1: Navigate to Sales
From Home Page
Return to the home page and locate the yellow “Sales” button. Press the Sales button to proceed to the items list.
Items List
You will see a list of all items currently available for sale (these are the items assigned to your terminal).
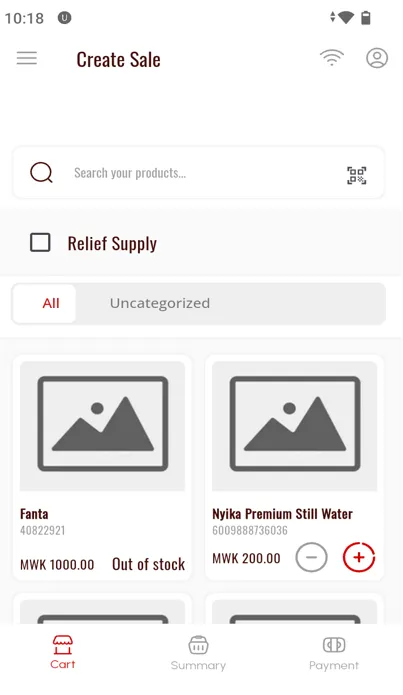
Step 2: Select Items
Adding Items to Cart
- Tap on the item you wish to sell
- The number of items will appear on top of the item card
- Tap multiple times to increase quantity
- Continue selecting other items as needed
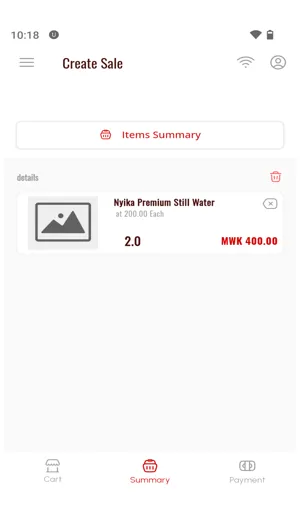
Navigate to Summary
Once you have selected all items:
- Press the “Summary” button at the bottom of the screen
- This will take you to the sales summary page
Step 3: Review Summary
The summary page shows:
- All selected items
- Quantities for each item
- Individual prices
- Subtotals
- Tax calculations
- Grand total
Make Changes
If you need to adjust:
- Go back to modify quantities
- Remove items if necessary
- Add more items to the sale
Step 4: Process Payment
Navigate to Payment
From the summary page, click the “Payment” button at the bottom.
Attach Customer (Optional)
If the sale is for a VAT registered customer, you can search and select the customer at this stage.
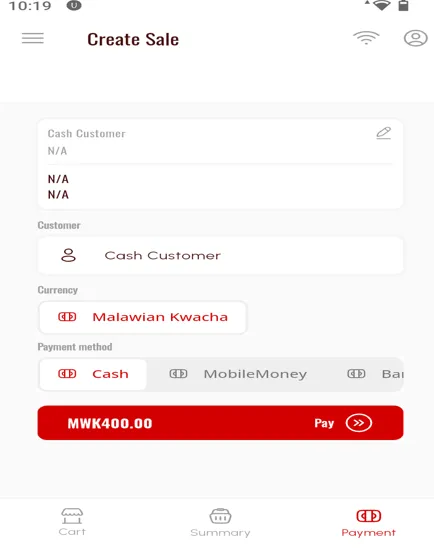
Select Payment Method and Enter Amount
On the payment page:
- Select the payment method: Cash, Card, Mobile Money, or other available methods
- Press the “Pay” button
- A popup will appear requesting the tendered amount
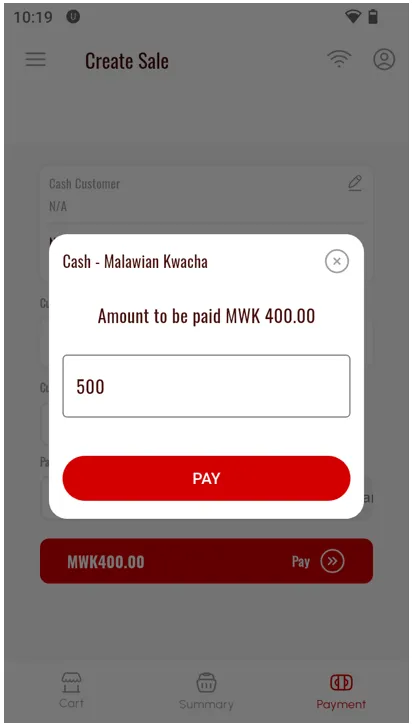
- Enter the amount given by the customer
- The system will automatically calculate change
- Confirm the payment to proceed
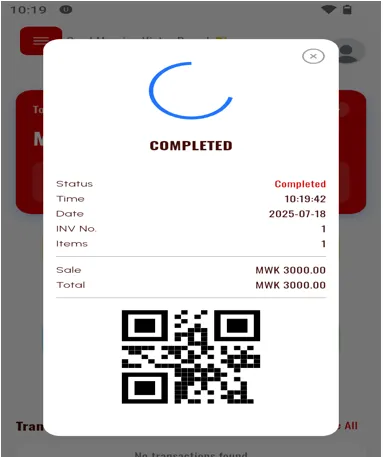
Step 5: Invoice Confirmation
Success Dialog
After confirming payment, you will see a confirmation dialog showing “Invoice Success”. The invoice will be automatically printed at this stage.
After the Sale
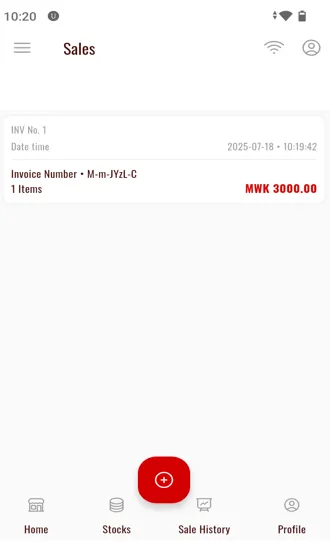
View Sales History
You can view all previously completed sales:
- Press the X on the success dialog to return to main screen, or
- Press the “Sales History” button on the bottom navigation bar
- Press the red plus icon at the bottom right to start a new sale
Sales with VAT Customers
If the sale is for a VAT registered customer, you can attach customer information during the payment step.
Learn more: Adding Customers Guide
Troubleshooting
Item Not Showing
Problem: Cannot find an item in the items list
Solutions:
- Verify the item is assigned to your terminal in MRA portal
- Run terminal configuration again to refresh products
- Check if item is properly registered in MRA system
- Contact your administrator
Payment Failed
Problem: Payment process fails or times out
Solutions:
- Check internet connection
- Verify terminal configuration is up to date
- Retry the payment
- Check MRA server status
Invoice Not Printing
Problem: Invoice doesn’t print after sale
Solutions:
- Check printer connection
- Ensure printer has paper
- Check printer power
- Restart printer
- Check if invoice was sent to MRA (can reprint from sales history)
Wrong Item or Quantity
Problem: Selected wrong item or quantity
Solutions:
- Go back from summary page before payment
- Adjust quantities or remove items
- Cancel sale and start over if needed
Best Practices
Quick Reference
| Step | Action | Location |
|---|---|---|
| 1. Start Sale | Press Sales button | Home page |
| 2. Select Items | Tap items, set quantities | Items list |
| 3. Review | Press Summary button | Bottom of items list |
| 4. Payment | Select method & enter amount | Payment page |
| 5. Complete | Invoice prints automatically | Success dialog |
Next Steps
Learn how to add and manage customer information for VAT-registered customers: