
Adding Customers
This guide explains how to add and manage customers in REVPOS, particularly for VAT registered customers with Buyer Authorization Codes (BAC) or regular customers for record-keeping.
When to Add Customers
You should add customers when:
- Customer is VAT registered and has a Buyer Authorization Code
- Customer is a regular/frequent buyer
- You need to track sales by customer
- Customer requests invoices with their TIN
Step 1: Access Customers Page
Open Side Menu
- Press the menu button (three horizontal lines) at the top left of any page
- From the side menu, select “Customers”
- You will be navigated to the Customers page
- Press the red plus button at the bottom right of the screen
Step 2: Enter Customer Information
You will be presented with the customer registration form.
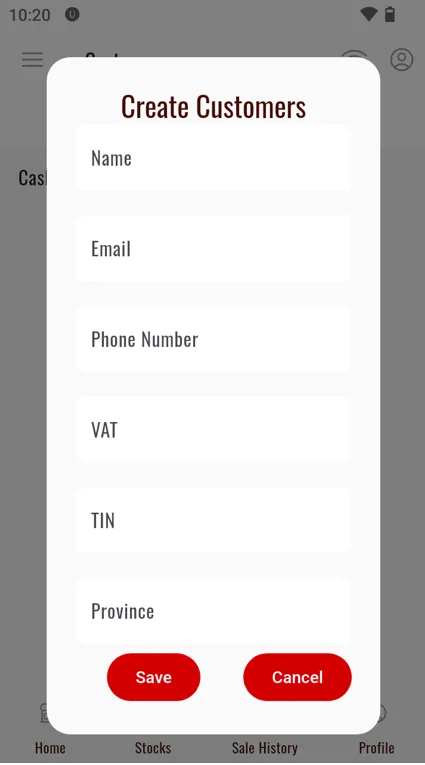
Required Information
Enter all required customer information:
- Customer Name
- Full business or individual name
- TIN (Tax Identification Number)
- Customer’s TIN as registered with MRA
- Required for VAT customers
- Buyer Authorization Code (if applicable)
- BAC provided by the customer
- Will be validated in the next step
- Contact Information
- Phone number
- Email address (if available)
- Address (if required)
- Physical or business address
Save Customer
After entering all information:
- Review the details for accuracy
- Press the “Save” button to save the customer
Step 3: Validate Authorization Code
After saving, the customer will appear in your customers list.

Access Customer Options
- Locate the customer in the list
- Press the three dots (⋮) next to the customer’s name
- A menu will appear with three options
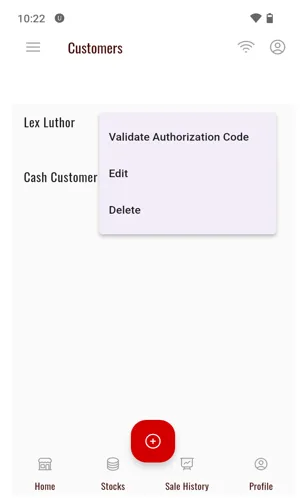
Available Options:
- Edit - Modify customer information
- Validate Authorization Code - Verify BAC with MRA
- Delete - Remove customer from system
Validate the Authorization Code
- Select “Validate Authorization Code” from the menu
- You will be presented with the validation screen
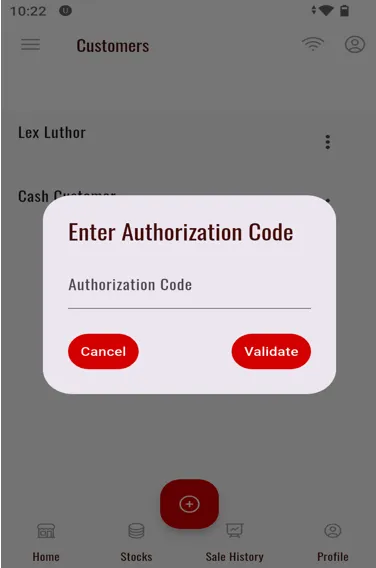
- Enter the customer’s authorization code for validation
- Press “Validate” to verify with MRA servers
Step 4: Attach Customer to Sale
Once a customer is added and validated, you can attach them to sales transactions.
During Payment Step
When making a sale, at the final payment step:
- Locate the customer search field
- Search for the customer’s name
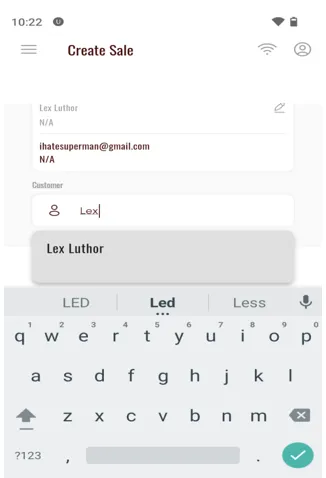
- Click on the customer’s name from the search results
- The customer information will be populated at the top
What Happens When You Attach a Customer
When you attach a customer to a sale:
- Customer’s TIN is included in the invoice
- Authorization code is sent to MRA
- Invoice shows customer details
- Sale is linked to customer for history tracking
Managing Customers
Edit Customer Information
- Go to Customers page
- Tap three dots (⋮) next to customer name
- Select “Edit”
- Update information as needed
- Press “Save”
Delete Customer
- Go to Customers page
- Tap three dots (⋮) next to customer name
- Select “Delete”
- Confirm deletion
View Customer Sales History
From the customers page, you can typically:
- View past transactions for specific customers
- Generate customer-specific reports
- Track customer purchase patterns
Troubleshooting
Authorization Code Validation Failed
Problem: “Invalid authorization code” or validation error
Solutions:
- Verify the code with the customer
- Ensure the code is entered correctly (check for spaces or special characters)
- Confirm customer is registered with MRA
- Check if authorization code has expired
- Contact MRA for code verification
Customer Not Appearing in Search
Problem: Cannot find customer when searching during payment
Solutions:
- Check spelling of customer name
- Verify customer was saved successfully
- Try searching by partial name
- Return to customers page to confirm customer exists
- Refresh the customer list
Cannot Save Customer
Problem: Save button doesn’t work or shows error
Solutions:
- Ensure all required fields are filled
- Check TIN format is correct
- Verify internet connection
- Check for duplicate customer entries
- Restart app if necessary
Customer Information Wrong on Invoice
Problem: Incorrect details appear on printed invoice
Solutions:
- Edit customer information
- Revalidate authorization code
- Ensure correct customer was selected during sale
- Check for data entry errors
Best Practices
Quick Reference
| Task | Steps | Location |
|---|---|---|
| Add Customer | Menu → Customers → + button | Side menu |
| Validate BAC | Three dots → Validate Authorization Code | Customers list |
| Attach to Sale | Search customer name during payment | Payment screen |
| Edit Customer | Three dots → Edit | Customers list |
| Delete Customer | Three dots → Delete | Customers list |
Next Steps
Learn how to configure and activate the tourism levy for applicable sales:
Or return to making sales with customer information: